블로그 이미지
분무기로 구름을 만들어 비가 내리다. 비내리는사막

카테고리

분류 전체보기 (28)
Cloud (9)
IT용어 (1)
뽐뿌 (1)
개인 (1)
Total
Today
Yesterday

달력

« » 2024.11
1 2
3 4 5 6 7 8 9
10 11 12 13 14 15 16
17 18 19 20 21 22 23
24 25 26 27 28 29 30

공지사항

최근에 올라온 글


출처 : http://www.programkr.com/blog/MQjM2ADMwYTy.html


session 세션 유지 의 session 서버 -tomcat + msm + memcached

위상 다이어그램

image

준비 환경: 
때문에 컴퓨터 구성 썩어 가상 기계 유한 때문에 한 가상 머신 동시에 대해 다양한 서버 사용 유형. 
두 tomcat 노드: 172.16.19.1(tomcatA.luo.com), 172.16.19.21(tomcatB.luo.com)
두 memcached 노드: 172.16.19.21, 172.16.19.22
한 부하 균형 노드(httpd): 172.16.19.1

쌍방이 모두 대한 기본적인 jdk 및 tomcat 설치

설치jdk

패키지 다운로드 설치 및 설치: 

# rpm -ivh jdk-7u9-linux-x64.rpm 
Preparing...                ########################################### [100%]
   1:jdk                    ########################################### [100%]
Unpacking JAR files...
    rt.jar...
Error: Could not open input file: /usr/java/jdk1.7.0_09/jre/lib/rt.pack
    jsse.jar...
Error: Could not open input file: /usr/java/jdk1.7.0_09/jre/lib/jsse.pack
    charsets.jar...
Error: Could not open input file: /usr/java/jdk1.7.0_09/jre/lib/charsets.pack
    tools.jar...
Error: Could not open input file: /usr/java/jdk1.7.0_09/lib/tools.pack
    localedata.jar...
Error: Could not open input file: /usr/java/jdk1.7.0_09/jre/lib/ext/localedata.pack

설명: 이 오류 무시 잠시 돼, 안 영향을 사용
설치 디렉터리 보기 java
# ll /usr/java/
total 4
lrwxrwxrwx 1 root root 16 Sep 26 06:03 default -> /usr/java/latest
drwxr-xr-x 10 root root 4096 Sep 26 06:03 jdk1.7.0_09
lrwxrwxrwx 1 root root 21 Sep 26 06:03 latest -> /usr/java/jdk1.7.0_09
latest링크 지정한 최신 버전

수정 환경 변수
# vim /etc/profile.d/java.sh
export JAVA_HOME=/usr/java/latest
export PATH=$JAVA_HOME/bin:$PATH
# . /etc/profile.d/java.sh

버전 정보 보기
# java -version
java version "1.7.0_09"
Java(TM) SE Runtime Environment (build 1.7.0_09-b05)
Java HotSpot(TM) 64-Bit Server VM (build 23.5-b02, mixed mode)

설치Tomcat
압축을 풀 결코 링크
# tar -xf apache-tomcat-7.0.42.tar.gz -C /usr/local
# cd /usr/local
# ln -sv apache-tomcat-7.0.42 tomcat
`tomcat' -> `apache-tomcat-7.0.42'

수정 환경 변수
# vim /etc/profile.d/tomcat.sh
export CATALINA_HOME=/usr/local/tomcat
export PATH=$CATALINA_HOME/bin:$PATH
# . /etc/profile.d/tomcat.sh

시작tomcat

# catalina.sh start  # 혹은 명령어 사용하기 startup.sh, 기본 포트 사용 8080 먼저 포트 결정 안 점용되었다
Using CATALINA_BASE:   /usr/local/tomcat
Using CATALINA_HOME:   /usr/local/tomcat
Using CATALINA_TMPDIR: /usr/local/tomcat/temp
Using JRE_HOME:        /usr/java/latest
Using CLASSPATH:       /usr/local/tomcat/bin/bootstrap.jar:/usr/local/tomcat/bin/tomcat-juli.jar

보기 시작 포트
# netstat -tnlp |grep java
tcp 0 0 :::8080 :::* LISTEN 4357/java 
tcp 0 0 ::ffff:127.0.0.1:8005 :::* LISTEN 4357/java 
tcp 0 0 :::8009 :::* LISTEN 4357/java

보기 버전

# cd /usr/local/tomcat
# catalina.sh version 또는 version.sh
Using CATALINA_BASE:   /usr/local/tomcat
Using CATALINA_HOME:   /usr/local/tomcat
Using CATALINA_TMPDIR: /usr/local/tomcat/temp
Using JRE_HOME:        /usr/java/latest
Using CLASSPATH:       /usr/local/tomcat/bin/bootstrap.jar:/usr/local/tomcat/bin/tomcat-juli.jar
Server version: Apache Tomcat/7.0.42
Server built:   Jul 2 2013 08:57:41
Server number:  7.0.42.0
OS Name:        Linux
OS Version:     2.6.32-431.el6.x86_64
Architecture:   amd64
JVM Version:    1.7.0_09-b05
JVM Vendor:     Oracle Corporation

테스트 tomcat 성공적으로 실행: 
image

둘째, 설정 대리, 부하 균형, memcached

memcached-session-manager프로젝트 주소, http://code.google.com/p/memcached-session-manager/

다음 파일을 다운로드 jar ~ 각 tomcat 노드 tomcat 설치 디렉터리 아래 lib 디렉터리에 중 소프트웨어 버전 번호 나랑 tomcat 같은 버전 번호.

node, node1 노드: 

memcached-session-manager-1.8.2.jar
memcached-session-manager-tc7-1.8.2.jar
msm-javolution-serializer-1.8.2.jar
spymemcached-2.10.2.jar
javolution-5.5.1.jar

각각 두 tomcat 위의 어떤 host 위에 정의 테스트 하는 context 용기 있으며 이 가운데 만듭니다. 세션 관리자, 다음과 같이 하는 지시 (node, node1 노드):

<Context path="/test" docBase="/usr/local/tomcat/webapps/test" reloadable="true">
   <Manager className="de.javakaffee.web.msm.MemcachedBackupSessionManager"
       memcachedNodes="n1:172.16.19.21:11211,n2:172.16.19.22:11211"
       failoverNodes="n1"
       requestUriIgnorePattern=".*\.(ico|png|gif|jpg|css|js)$"
       transcoderFactoryClass="de.javakaffee.web.msm.serializer.javolution.JavolutionTranscoderFactory"/>
</Context>


각각 두 context 제공 테스트 페이지:

node(tomcatA):
# mkdir -pv /usr/local/tomcat/webapps/test/WEB-INF/{classes,lib}
# vim /usr/local/tomcat/webapps/test/index.jsp
다음 컨텐츠 추가: 

<%@ page language="java" %>
<html>
  <head><title>TomcatA</title></head>
  <body>
    <h1><font color="red">TomcatA.luo.com</font></h1>
    <table align="centre" border="1">
      <tr>
        <td>Session ID</td>
    <% session.setAttribute("luo.com","luo.com"); %>
        <td><%= session.getId() %></td>
      </tr>
      <tr>
        <td>Created on</td>
        <td><%= session.getCreationTime() %></td>
     </tr>
    </table>
  </body>
</html>

node1(tomcatB):
# mkdir -pv /usr/local/tomcat/webapps/test/WEB-INF/{classes,lib}
# vim /usr/local/tomcat/webapps/test/index.jsp
다음 컨텐츠 추가: 

<%@ page language="java" %>
<html>
  <head><title>TomcatB</title></head>
  <body>
    <h1><font color="red">TomcatB.luo.com</font></h1>
    <table align="centre" border="1">
      <tr>
        <td>Session ID</td>
    <% session.setAttribute("luo.com","luo.com"); %>
        <td><%= session.getId() %></td>
      </tr>
      <tr>
        <td>Created on</td>
        <td><%= session.getCreationTime() %></td>
     </tr>
    </table>
  </body>
</html>


지금 node 노드 (172.16.19.1) 에서 설정 역방향 대리 부하 균형 내용

새 파일 수 mod_http.con 비슷한 다음과 같다 개 주시기 바랍니다:

설정 apache mod_proxy 모듈 및 Tomcat 연결을 통해서

관련 보기 모듈 사용 여부

[root@node ~]# httpd -M |grep proxy
Syntax OK
proxy_module (shared)
proxy_balancer_module (shared)
proxy_ftp_module (shared)
proxy_http_module (shared)
proxy_ajp_module (shared)
proxy_connect_module (shared)


# vim /etc/httpd/conf.d/mod_http.conf 

<Proxy balancer://tomcat>
    BalancerMember  http://172.16.19.1:8080 loadfactor=1
    BalancerMember  http://172.16.19.21:8080 loadfactor=1
# 사용하면 사용 ajp 은 아래 위 현행 현행 바꿀 수 있다
#   BalancerMember  ajp://172.16.19.1:8009 loadfactor=1
#   BalancerMember  ajp://172.16.19.21:8009 loadfactor=1
    ProxySet  lbmethod=byrequests
</Proxy>

<Location /status>
    SetHandler balancer-manager
    ProxyPass !
    Order allow,deny
    Allow from all
</Location>

ProxyPass / balancer://tomcat/
ProxyPassReverse / balancer://tomcat/


mod_jk 있는 부하 균형 기반

# yum -y install httpd-devel
# rpm -ql httpd-devel |grep apxs
# tar xf tomcat-connectors-1.2.40-src.tar.gz
# cd tomcat-connectors-1.2.40-src/native
# ./configure --with-apxs=/usr/sbin/apxs
# make && make install

# cat /etc/httpd/conf.d/mod_jk.conf #새 파일 추가, 그 전에 추가 mod_http.conf 잠시 고쳐 후속 개

LoadModule  jk_module  modules/mod_jk.so
JkWorkersFile  /etc/httpd/conf.d/workers.properties
JkLogFile  logs/mod_jk.log
JkLogLevel  debug #디버그 할 때 사용하는 것을
JkMount  /*  lbA
JkMount  /status/  statA

# cat /etc/httpd/conf.d/workers.properties 

worker.list = lbA,statA
worker.TomcatA.type = ajp13
worker.TomcatA.host = 172.16.19.1
worker.TomcatA.port = 8009
worker.TomcatA.lbfactor = 1
worker.TomcatB.type = ajp13
worker.TomcatB.host = 172.16.19.21
worker.TomcatB.port = 8009
worker.TomcatB.lbfactor = 1
worker.lbA.type = lb
worker.lbA.sticky_session = 0
worker.lbA.balance_workers = TomcatA,TomcatB
worker.statA.type = status

지금 양쪽 주 설정 파일에 더하기 jvmRoute 인자를 받음
# cat /usr/local/tomcat/conf/server.xml
<Engine name="catalina" defaultHost="localhost" jvmRoute="TomcatA ">
<Engine name="catalina" defaultHost="localhost" jvmRoute="TomcatB ">

# catalina.sh start
# service httpd restart


세, 설정 node1 및 node2 것이다memcached

# yum install –y install memcached

# service memcached start

# ss –tnl |grep 11211


네, 테스트 결과
브라우저에서 방문, 결과는 다음과 같다 개 보이다, 그 session ID 는 부하 균형 환경에서 바꾸지 않기.

image
부하 균형 및 session 바인딩 이미 이룰 수 있다

2, 아날로그 node2 고장, 정지 node2 볼 수 있는 memcached, 이미 이동 n1 (memcached1) 위에 거야 그리고 session 바꾸지 않기
[root@node2 ~]# service memcached stop

image

글쓴이 준호 작성일 2014-10-03 01:22


Posted by 비내리는사막
, |

1. 윈도우 hosts 파일 수정 프로그램

이름 : 삭신의 도구들

http://saksin.tistory.com/1159


서비스나 시스템을 변경 하는 작업을 하는 경우 테스트를 하기 위해서 hosts 파일 내용을 변경이 필요 했었는데,

이를 수시로 변경하면서 테스트 해야 할 일들이 존재합니다. 


헌데 기존에 hosts 파일 위치에 가서 직접 수정하고 저장하고 하는 것들은 권한문제도 종종 생기며, 번거롭습니다.

C:\windows\system32\drivers\etc\hosts 


해당 유틸리티는 저장소를 제공하며, 내용을 저장 해놓고 불러와서 적용 할 수 있는 기능들을 제공 하고 있다. 

가령, 테스트 환경의 서버 IP와 Stagging 시스템의 IP를 번갈아서 테스트 해볼 수 있다. 


2. 캡쳐 프로그램

이름 : 픽픽

http://ngwin.com/kr


다양한 캡쳐프로그램들이 있지만, 깔끔한 인터페이스에 간단한 편집 기능(픽픽에디터)까지 제공하고 있어서 매력적인 Tool.

옵션에 따라 캡쳐 할 때마다 특정 위치에 자동저장 가능하다. 


3. 일정 관리

이름 : wunderlist

https://www.wunderlist.com/ko/


4. 간단 메모

이름 : google keep

https://keep.google.com/


5. 메모 정리

이름 : Microsoft onenote

https://www.onenote.com/


6. 메모장, 코드 관리

6.1. 이름 : notepad++

https://notepad-plus-plus.org/


6.2. sublime text

https://www.sublimetext.com/


7. 파일 검색 유틸리티

이름 : everything 

http://www.voidtools.com/


8. 명함 관리 

이름 : 리멤버

https://rememberapp.co.kr/


9. 윈도우즈 커멘드 라인 

이름 : cmder

http://cmder.net/

cmd 보다 강력한 유틸리티로써, 리눅스와 같은 환경을 제공 한다.

ssh 명령도 제공


10. 윈도우 원격 접속 클라이언트

10.1. RDP

(Remote)

이름 : mremoteng

https://mremoteng.org

원래 무료였던 mRemote가 유료화되고 Royal TS로 바뀌면서 오픈소스화


11. SSH 원격 접속 클라이언트

11.1. poderosa

주소 : http://www.poderosa.org/


11.2. superputty

주소 : https://github.com/jimradford/superputty


11.3. 


12. 패스워드 관리

이름 : keepass

주소 : http://keepass.info/

설명 : 왼쪽 메뉴에 [Translations]를 통해서 한글 언어도 적용 가능

참고 : http://webdir.tistory.com/386


Posted by 비내리는사막
, |

JSP / JAVA


https://github.com/worldline/healthcheck/blob/master/healthcheck/healthcheck-servlet/src/test/java/net/atos/xa/healthcheck/servlet/RegisterHealthCheckTestCase.java


출처 : http://docs.rightscale.com/faq/How_Do_I_Set_Up_a_Health_Check_Page_for_HAProxy.html


Background

This document explains how to create a health-check page that HAProxy will use to check the status of a web server or application.

While the exact contents of your health-check page are not important, its name should be unique (e.g. including a random number). The same page is used for all application servers to determine whether the server is running (up). While you are not prevented from using index.html as the health-check page, this is not recommended. This is because most web sites have an index.html page and, thus, there is a risk that your load balancer will direct client traffic to a web site other than your own in the cloud. For this reason, you should always use a health-check URI with a unique file name.

Example: The Amazon EC2 cloud recycles IP addresses; so, if one server was terminated and another launched for a different site—with the same IP address and page name as your health-check page name (specified in your HEALTH_CHECK_URI RightScript input)—HAProxy could consider the server to be running and part of the load-balancer pool even though it is someone else's, and direct traffic to it.

Answer

Follow the steps below to set up a Health Check Page for HAProxy for your application (Tomcat, Rails, PHP).

When following the below examples, substitute occurrences of <######> or ###### with your own unique, random numeric string.

Warning: When specifying a HEALTH_CHECK_URI RightScript input, remember to include the health-check file in your application bundle. For example, in the case of Apache Tomcat, if you set HEALTH_CHECK_URI to /health\_check378923.jsp, remember to include health_check378923.jsp in your WAR file.

Set up a Health Check Page

Apache Tomcat

  1. Create a file named health_check<######>.jsp in your application with the following contents.

    <HTML>
      <HEAD>
        <TITLE>Hello World</TITLE>
      </HEAD>
      <BODY>
        <H1>Hello World</H1>
        Today is: <%= new java.util.Date().toString() %>
      </BODY>
    </HTML>
    
  2. Set your HEALTH_CHECK_URI script input to:

    /health\_check_<######>_.jsp

Ruby on Rails/Mongrel

  1. Create a file named mongrel_health_check.rb with the below contents, and add it to your server or repository.

    ####
    # Copyright (c) 2011 RightScale, Inc, All Rights Reserved Worldwide.
    #
    # THIS PROGRAM IS CONFIDENTIAL AND PROPRIETARY TO RIGHTSCALE
    # AND CONSTITUTES A VALUABLE TRADE SECRET. Any unauthorized use,
    # reproduction, modification, or disclosure of this program is
    # strictly prohibited. Any use of this program by an authorized
    # licensee is strictly subject to the terms and conditions,
    # including confidentiality obligations, set forth in the applicable
    # License Agreement between RightScale.com, Inc. and
    # the licensee.
    #
    # Handler for status/health checks.
    # Load balancers (or other machines for that matter) will be able to monitor the health of
    # each mongrel by retrieving a successful response from this handler
    # This file can be included in the configuration of the mongrels (i.e., mongrel_cluster.yml)
    # config_script: lib/mongrel_health_check_handler.rb
    
    # This must be called from a Mongrel configuration...
    class MongrelHealthCheckHandler < Mongrel::HttpHandler
      def initialize
        #Make sure it's expired by the time we process the first request
        @DB_OK_at= Time.at(0)
        @freshness= 30
        @error_msg=""
      end
      def process(request,response)
    
        # Write down if it's time to do a more heavyweight check
        db_stale=true if( (Time.now()-@DB_OK_at).to_i > @freshness )
    
        check_db if db_stale
    
        code = ( (Time.now()-@DB_OK_at).to_i > @freshness )? 500:200
        # Return OK if ActiveRecord is not connected yet (i.e., test mongrel only)
        code = 200 unless ActiveRecord::Base.connected?
    
        response.start(code) do |head,out|
          head["Content-Type"] = "text/html"
    
          t = Time.now()
          out.write "Now: #{t} , DB OK #{(t-@DB_OK_at).to_i}s ago\n"
          out.write "ERROR:#{@error_msg}" if @error_msg != ""
        end
      end
    
      # Check health of DB, and update the @DB_OK_at timestamp if it succeeds
      def check_db
        if ActiveRecord::Base.connected?
          begin      
            ActiveRecord::Base.connection.verify!(0) #verify now (and reconnect if necessary)
            ActiveRecord::Base.connection.select_value("SELECT NOW()")
            @DB_OK_at = Time.now
            @error_msg = ""
          rescue Exception => e
            # Do your logging/error handling here
            @error_msg = e.inspect
          end
        end
      end
    end
    
    uri "/mongrel-status######", :handler => MongrelHealthCheckHandler.new, :in_front => true
    
  2. Modify the last line in the above file so that the page can be uniquely identified with your application (e.g. change mongrel-status_######_ to mongrel-status1234089).

  3. Add the following to /etc/mongrel_cluster/mongrel_cluster.yml:
    config\_script:&nbsp; _<PathToFile>_/mongrel\_health\_check.rb Or, alternatively, set your OPT_MONGREL_CONFIG_SCRIPT input to the path where you saved the above file. Be sure to specify the full path to the file from the base directory of your Rails application; e.g. lib/mongrel\_health\_check\_handler.rb.

  4. Set HEALTH_CHECK_URI to the value you specified at the end of the file above: /mongrel-status_<######>_

PHP

  1. Create a file named health_check_<######>_.php in your application with the following contents.

    <?php
    phpinfo();
    ?>
    
  2. Set  OPT_HEALTH_CHECK_URI to: /health_check_<######>_.php

Verify Health Check Pages

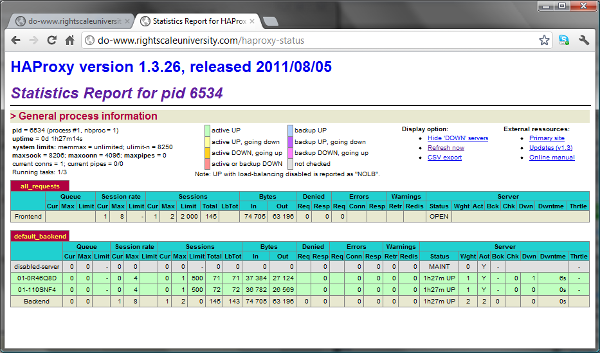
If your site's permissions allow it (and assuming that your script input OPT_LB_STATS_URI is set to haproxy-status) you can simply add /haproxy-status to your load-balancer hostname URL to display an HAProxy status report in a tabular HTML format:

Example: http://www.mysite.com/haproxy-status

faq-HAProxyStatus.png

Posted by 비내리는사막
, |

RPM 패키지는 존재하지만, debian (ubuntu)계열에서 사용되는 deb 패키지가 존재하지 않는 경우가 있다. 


이 경우는 alien 패키지를 통해서 변환해서 사용 할 수 있다.


  • alien : rpm 패키지를 Debian 패키지로 변환하는 툴

# alien package installation 

sudo apt-get install -y alien


rpm 패키지가 존재하는 곳으로 이동하거나, 절채경로 입력

sudo alien --scripts -d oracle-xe-11.2.0-1.0.x86_64.rpm


* 변환시간이 일정시간 소요 된다. (사양에 따라 다르지만, 기다림을 필요)


아래처럼 deb 파일이 생성 되는 것을 확인 할 수 있다.

oracle-xe-11.2.0-1.0.x86_64.rpm

oracle-xe_11.2.0-2_amd64.deb


# deb install

dpkg-i oracle-xe_11.2.0-2_amd64.deb


Posted by 비내리는사막
, |

출처 : http://zetawiki.com/wiki/%EB%A6%AC%EB%88%85%EC%8A%A4_sudo_%ED%8C%A8%EC%8A%A4%EC%9B%8C%EB%93%9C_%EC%97%86%EC%9D%B4_%EC%82%AC%EC%9A%A9


방법[편집]

사용자명 ALL=NOPASSWD: ALL
→ 여기서 NOPASSWD:를 빼면 sudo 실행시 자신의 패스워드를 입력해야만 함
사용자명 ALL=NOPASSWD: 명령어1, 명령어2
→ 지정한 명령어들만 sudo 사용가능

실습 1: 모든 명령어 사용가능[편집]

  • 신규 계정 testuser1 생성
[root@localhost ~]# useradd testuser1
[root@localhost ~]# echo 'P@ssw0rd1' | passwd --stdin testuser1
Changing password for user testuser1.
passwd: all authentication tokens updated successfully.
[root@localhost ~]# cat /etc/passwd | grep testuser1
testuser1:x:500:500::/home/testuser1:/bin/bash
  • testuser1 sudo 권한 추가(+NOPASSWD)
[root@localhost ~]# echo 'testuser1 ALL=NOPASSWD: ALL' >> /etc/sudoers
[root@localhost ~]# cat /etc/sudoers | tail -2
#includedir /etc/sudoers.d
testuser1 ALL=NOPASSWD: ALL
  • testuser1 계정으로 sudo 실행
[root@localhost ~]# su - testuser1
[testuser1@localhost ~]$ reboot
reboot: Need to be root
[testuser1@localhost ~]$ sudo reboot
The system is going down for reboot NOW!
→ 패스워드 입력 없이 sudo reboot 가능

실습 2: 지정한 명령어만 사용가능[편집]

[root@localhost ~]# visudo
변경 전
... (생략)
#includedir /etc/sudoers.d
testuser1 ALL=NOPASSWD: ALL
변경 후
... (생략)
#includedir /etc/sudoers.d
testuser1 ALL=NOPASSWD: /usr/sbin/useradd, /usr/sbin/userdel
[root@localhost ~]# cat /etc/sudoers | tail -2
#includedir /etc/sudoers.d
testuser1 ALL=NOPASSWD: /usr/sbin/useradd, /usr/sbin/userdel
  • testuser1 계정으로 sudo 실행 테스트
[root@localhost ~]# su - testuser1
[testuser1@localhost ~]$ sudo reboot
[sudo] password for testuser1: 
Sorry, user testuser1 is not allowed to execute '/sbin/reboot' as root on localhost.localdomain.
→ sudo reboot에 대해서는 패스워드 물어본다.
→ 자신의 패스워드(P@ssw0rd1)를 정확히 입력해도 권한없어 실행불가
[testuser1@localhost ~]$ sudo useradd mallory
[testuser1@localhost ~]$ cat /etc/passwd | grep mallory
mallory:x:501:501::/home/mallory:/bin/bash
→ sudo useradd에 대해서는 패스워드 입력 없이 실행가능


Posted by 비내리는사막
, |

1. T 아카데미 동영상 강좌

https://www.youtube.com/channel/UCtV98yyffjUORQRGTuLHomw


2. T 아카데미 강좌 수강 (무료)

https://tacademy.sktechx.com/live/player/onlineLectureDetail.action


3. AWS 공인 솔루션스 아키텍트 - 어소시에이트 수험 가이드

https://github.com/serithemage/AWSCertifiedSolutionsArchitectUnofficialStudyGuide


4. 생활코딩 AWS 강좌

https://opentutorials.org/course/608/3002


5. 아마존 웹 서비스를 다루는 기술 - 온라인 원고 공개

http://pyrasis.com/aws.html


6. 아마존에서 소개 하는 AWS 공부방법

https://aws.amazon.com/ko/blogs/korea/how-to-learn-aws-cloud-books/


번외1. 코딩 교육

http://tryhelloworld.co.kr/

교육을 들으면서 실습 해볼 수 있는 환경 제공


AWS 정도현님 블로그


http://blog.creation.net/channy-cloud-clinic-ep11


Posted by 비내리는사막
, |

Bluestacks Graphics Card Error 25000


http://www.trickyways.com/2014/09/fix-bluestacks-graphic-card-error-25000-installing/

Posted by 비내리는사막
, |

RDS 서비스 메뉴에서 Parameters Groups 메뉴로 이동

현재 MySQL 인스턴스에 적용된 Parameters Group을 편집한다.

항목 중 log_bin_trust_function_creators 라는 친구가 있는데 이걸 0에서 1로 올려준다.

그리고 저장하고 해당 Parameter Group이 적용되면, 유저가 만든 데이터베이스에 대해서는 super 권한을 행사할 수 있다.

Posted by 비내리는사막
, |


1. 변경 할 Image 생성. 

- Snapshot에서 이미지를 생성해도 되나 아래 화면은 EC2 Instance에소 바로 이미지 생성 하는 화면

- 유의사항 : No reboot 선택해야 시스템 reboot 없이 진행 

- DB와 같이 실시간 데이터나 데이터 무결성이 중요한 시스템은 변경 된 데이터에 대해 달라질 수 있음


2. [EC2] => [Auto Scaling] => [Launch Configurations] => 기존 Launch configuration을 선택 후 오른쪽 마우스 클릭 => [Copy launch configurain] 


3. 1번에서 생성 한 Image 선택

[My AMIs] => [Created Image Select] => [Next]


4. Instance Type 지정


5. 이름 지정


6. 변경 된 Launch Configuration 적용

[EC2] => [Auto Scaling] => [Auto Scaling Group] => [변경 할  AG 선택] => [Edit] 


7. Launch Configuration 항목을 눌러 Copy한 AG로 변경.


'Cloud > AWS' 카테고리의 다른 글

AWS 스터디 및 공부방법 링크  (0) 2016.11.22
[AWS] RDS Root 권한 획득  (0) 2016.01.29
[AWS] Region간 Migrion 방법론  (0) 2016.01.10
[AWS] RDS Local Time 업데이트  (0) 2015.12.23
AWS Region Name - 국가코드  (0) 2015.11.24
Posted by 비내리는사막
, |

2016년 1월 7일자로 AWS의 12번째 Region인 한국의 Seoul Region이 오픈 되었다.


도입을 검토 하던 많은 기업과 사용자들에게 반가운 소식이 아닐까 싶은데,

기존에 일본에서 도쿄리전에서 사용하고 있던 사용자들은 마이그레이션에 대한 고민을 하지 않을 수 없을 듯 싶다.


사실 마이그레이션이라 함은 쉬운작업이 아니다. 

서비스 운영중에 옴긴다는 것은 많은 것을 고려 해야만 하고 신중해야 하는 작업일 것이다.


아직 서울 리전은 서비스에 오픈되어 있더라도 안되는 내용들이 조금씩 보이고 있다,

CloudFront 에서 ELB 검색이 되질 않는다던지..

Code 3총사들과 같은 서비스는 아직 오픈이 되어있지 않는다는 등.


그래서 일단 신중하라고 얘기하고 싶다. 

바로 서비스를 이전하기 보다는 테스트 먼저 선행 되어야 하며,그리고 이전을 위해서는 직접 하기 보단, 전문 업체에 의뢰하는 것이 좋다


혹여 이 글을 보는 분들 중에 당장 마이그레이션을 검토 중이라면 천천히 이동하는 것을 권고하고 싶다.


아마존에서 제공하는 마이그레이션 백서 (한글판)

RegionMigration_0401013.pdf

https://d0.awsstatic.com/whitepapers/International/ko/RegionMigration_0401013.pdf

Posted by 비내리는사막
, |

최근에 달린 댓글

글 보관함